
Have you ever had a day when things just didn't go the way they were planned? Well that was my yesterday! I wanted to post a project that I'm working on featuring Jelly Bean Pots but that was not meant to be. So I wll feature that a little later this week. In the meanwhile, I'll share a new recipe with you. You might remember that I'm a huge fan of Sandra Lee and love the concept of semi-homemade. That's where this recipe comes in. My mother loves lemon anything and I wanted to test a few recipes that used lemon. I decided to play "Sandra Lee" and spruce up a boxed cake mix with a little added zest. Here's my version of Lemon Curd Layer Cake. I was really happy with the way it tured out. Here's what I used.
 Here's my version of Lemon Curd Layer Cake. I was really happy with the way it tured out. Here's what I used.
1 pkg. Duncan Hines Lemon Supreme cake mix
3 teaspoons of fresh grated lemon peel
1 pkg Jello sugar free instant pudding - Lemon flavored
3 Eggs
1/3 cup Organic Canola Oil
1 1/3 cups of water
1 - 7.5 oz jar Dickinson's all-natural Lemon Curd
Lemon-Cheesecake Frosting (recipe below)
~~~~~~~~~~
Directions:
- Preheat oven to 375 degrees.
- Prepare two 8-inch round cake pans, butter bottom and sides.
- Mix first 5 ingredients together on low speed for 30 seconds until moistened. Then beat for 2 minutes on medium speed.
- Evenly divide the batter between the two pans and bake for 30-34 minutes on middle rack of heated oven.
- Remove cakes and allow to cool completely.
- Once the cakes are cooled, remove from the pans, level the layers by cutting away any rounded, raised cake from the tops.
- Place a little of the Lemon Curd on a cake stand (this will hold the bottom layer in place.) Place the bottom layer on top of the stand.
- Empty the entire contents of the Lemon Curd on top of the bottom layer. Spread to an even thickness across the entire layer.
- Place the second layer on top of the bottom layer, then frost with Lemon-Cheesecake Frosting.
- Garnish with fresh lemon slices.
 Lemon-Cheesecake Frosting
Take one tub of Duncan Hines Whipped Cream Cheese frosting and add 1 tablespoon of fresh squeezed lemon juice and two teaspoons of fresh grated lemon peel. Next, add 1 teaspoon of vanilla extract. Blend well on low with electric mixer.
 This cake turned out so moist and lemony. It was an incredible explosion of flavor! Mr. Panche never eats two helpings of dessert but last night he did declaring that "I could eat this cake every day of my life!" I thought that was little extreme but evidently he really enjoyed it. I have been staying away from sugar and high carb foods for awhile now but last night I sampled a small piece of my handiwork and I had to agree that it really was delicious. This will now be one of my "tried and true" recipes and I will do the honor of adding it to the family cookbook.
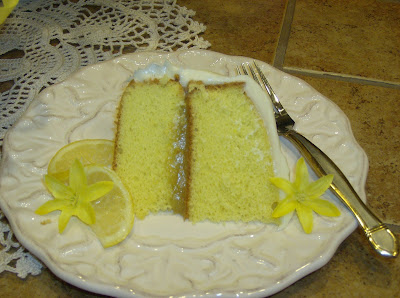 Here, I saved a slice for you. Enjoy!
 While the cake was baking I decided to put together a quick and easy centerpiece. I love working with fresh flowers but sometimes they are hard to arrange without a lot of special tools or the right containers. I had purchased three clear glass square jars from the Dollar Tree. Everything there is only $1 each. They are actually intended for candles but I decided to use them as vases. However the mouth of the vase was wide and the vase was shallow so I had to figure out a way to keep my flowers from falling out of the vase.
I have my photos out of order but here is what I did.
I embellished one vase for use as the centerpiece. I used grosgrain ribbon in yellow and brown. I simply hot glued the ribbon in two places to hold it in place.
 Next, I made my own "floral frog" but taking clear, waterproof tape and forming a crisscross pattern across the top of the vase. If you look closely you can see the pattern and the tape. Once you have completed the taping, simply tuck a single stem in each square opening in the tape. Start at the center and work your way to the edge. You can vary the height of the stems if you want but I kept mine the same. This gave me a more casual relaxed look.
 Here's a better shot of the three vases and the one I embellished with ribbon.
 This little project cost $10. Three vases - $3, 2 spools of ribbon - $2, tape - $1.99, yellow daisies - $3 at my local market.
 Since I wan in a lemony mood yesterday, these lemon-yellow daisies caught my eye. This little centerpiece made an eyecatching display on my kitchen island. When Mr. Panache and the boys came home, they were greeted by this cheery scene. The house was filled with the scent of fresh lemon cake baking in the oven and the happy color of sunshine. They wanted to know what was the special occasion. "No, special occasion, just wanted to say I love you guys", I said.
~~~~~~~~~
Hospitality truly begins at home. Don't wait for a special occasion to treat your loved ones special. Make an extra effort today to bless those who live in your home. Tomorrow I'll share the tablescape from our dinner last night. Betcha can't guess what color I used????
Until then,
Happy Cooking!
~Alisa


